Buying a secondhand phone comes with some added responsibility on your part. For those of us that like to save money where we can, but not sacrifice quality, we must be self prepared to identify how to do so. So let’s get into some of the basics of how to identify an original Samsung smartphone.
My wife had a friend in town over the weekend from Germany and somewhere along her travels she had forgotten her smartphone in the back of a taxi. Needless to say it was gone to the four winds. So that meant she had to go and buy a new, or used phone.
My wife’s friend is traveling for an extended time so she needs to be budget conscious and so she decided to look on one of the local “craigslist” type of sites to see if she could get a bargain deal. After some searching and emailing she ended up finding a Samsung Galaxy Note 5 for a reasonable price. However, regardless of price if it’s a fake or not working up to standards, no matter how cheap it is it is still a bad deal. Luckily I knew how to do some basic functions tests that we will now discuss.
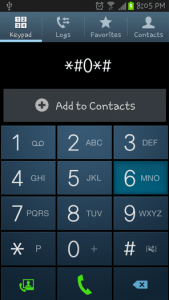
First you want to make sure that everything is original and all of the function tests work well. To do this you simply open your Samsung’s phone app and dial *#0*#. Once you do that you will get a screen that has at least 15 different function test boxes on it. Each one of these boxes is a separate test for your Samsung. So regardless of what any person or vendor tells you can perform your own functions test.
The top three will be your color test: RED, BLUE, and GREEN. To check these simply tap each box and the screen should turn to whatever color you selected, simply tap the screen again and it will return back to the function tests menu.
Next is the RECEIVER icon that will play a ringing sound when activated. That means the earphone and signals are properly working. The VIBRATION icon is next in line and just like the others simply tap it to make sure it vibrate. Then tap it again to get the functions menu back. DIMMING is the next one and when you tap this the three colors, red, yellow and blue should appear. Once they do you can tap the screen and the screen should dim. There are three settings to this so be sure to check them all by tapping the screen. Now you need to select the BACK button on the bottom of your handheld to return to the functions menu.
Moving along through the tests you will come across the CAMERA function. Be sure to test this one out to make sure that the flash and the camera are operating properly aside from just turning on. You will be prompted to take a picture to make sure it works and saves properly. Also make sure to test the FRONT CAMERA option; it works just the same, and to prove so you need to take a selfie.
Another function test that should be performed is the SENSOR function. This test tests demonstrates the working ability of the accelerometer and proximity sensors. The numbers should be changing very quickly in both up and down directions as they test the ambient light sources.
One of the most important tests to run is the TOUCH test. Simply tap the icon and a white screen with a series of boxes around the edge and an X through the middle will appear. To verify that your touchscreen s accurately working you need to trace this design around the edge and the X. As you move your finger along the pattern you will see the clear white squares turn light green, meaning that as you pass by them they indicate that they are indeed working correctly. If you cannot get the square to change colors that means that that particular part of the screen is dead. As we all know, ain’t nobody got time for a dead screen.
Another important system check are the speakers. To do it’s just like the others, simply tap the SPEAKER icon and your Samsung will bust out in a tune. If not, your speakers are non-functional and you should avoid purchasing that device. As well as general sound you need to test the LOW FREQUENCY too. There are three settings within the frequency test: 100 Hz, 200 Hz and 300 Hz. You may not be able to hear the 100 Hz (or even possibly you won’t be able to hear any of them) but a kind of cool byproduct of this test is that you can also hear/feel the quality of the build of the device.
We noticed that on a cheaper Samsung the 300 Hz rattled the interior of the phone, whereas with the note 4, a better built phone. You could not hear nor feel the additional vibration inside the phone. So if you have a high priced and built phone, this will test this too… even if it’s not the intended test.
Finally you will run across the HALL IC TEST. When you open that test it’ll just display Release, Working, and Release to indicate the functionality of your Hall IC. What the Hall IC demonstrates is if you use a magnetic cover for your phone, it proves that the magnet sensor will turn the phone off when you close your cover.
So there you have it, the most important functions test for your Samsung. Some Samsung phones will have more function tests. But we believe that the ones that we covered are the ones that you really need to test yourself to verify the functionality of your phone for the most common uses in everyday life.


